Super TapTo Boy
Super TapTo Boy is a custom case project created by Phoenix whereby a SNES shell is used (with a SBC inside) and is used in conjuction with a Super Gameboy (for reading the games). The Super Gameboy houses a PN532 NFC reader inside that is connected to a SBC (DE-10 Nano or Raspberry Pi) which itself is housed inside the SNES shell. They are then connected on the inside to each other through a wired USB connection.

The games' path is written on a NFC chip or tag via the TapTo Life app and the chip is then adhered to the inside of a GameBoy cartridge that is subsequently read by the NFC reader (which sits inside the Super GameBoy). This will in turn start the game on the desired hardware. You can find more information on how to use the TapTo Life app to write games to NFC chips here.
Introduction
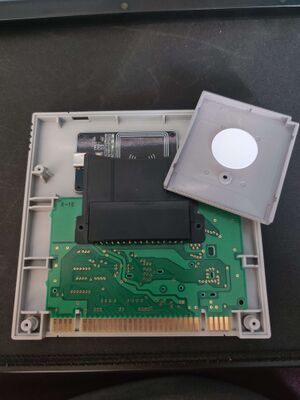
This project started it's life after contemplating on how best to use physical media together with sofware or hardware emulation. Since the MiSTer Project and the multitude of Linux-based Emulation operating systems have no physical media for games, a lot of people resort to modding and using their own classic consoles for the most nostalgic looking and feeling experience. Currently software and hardware emulation have come a long way and are in some cases (almost) interchangable with original hardware accuracy-wise. The abscence of physical media keeps people from viewing this route as a 'complete' and authentic experience.
The TapTo project introduces a new way for people to fill this gap with physical NFC cards. Super TapTo Boy tries to improve upon this concept with physical cartridges to replicate the feeling of inserting games and having a classic console to look at while keeping the cost relatively low compared to modding original hardware for the same performance.
The build
Here I will talk about building process of the Super TapTo Boy. As a disclaimer, the process will require some soldering skill and cutting/removing some parts of your existing hardware. I would rank this process as intermediate. If you like to tinker, read on, otherwise try to reach out to others for help before you do some irreversible damage.
With that out of the way, below I will list the requirements for this build. Try to acquire as much as you can before you begin.
First of all, we need either a European Super Nintendo or Japanese Super Famicom. The American Super Nintendo could probably work too, but since it's shape and size is a little bit different and I do not own one, I cannot with 100% certainty say that all of the steps will work 100% so your mileage may vary.
Secondly, you will need a Super Gameboy and some Gameboy cartridges. These may be bought online or they could even be your own cartridges that you want to put a NFC chip into (more on that later).
Preferable you will also need a 3D-printer to print some things for the build, but they are cosmetic and not mandatory.
You will also need some cables and other items like (also keep in mind that we have limited space in the case, so the smaller or shorter the items are, the better) :
Mandatory:
- A 90 degrees USB-C to USB-A cable
- Some shrink cables
- DuPont cables
- Round NFC tags (NTAG 215)
- A PN532 NFC reader with USB-C (black one)
- General tools like a plier and screwdrivers. Don't forget that you will need a 3.8 mm and 4.5 mm Gamebit screwdriver for both the Super Nintendo and the Super Gameboy/Gameboy cartridges.
- Double sided tape. I used the 3M heavy duty one.
Optional:
- A small USB hub for inside the case to hook your devices to. Don't make this too big or it won't fit. Also don't hook up too many (power hungry) devices to it as all of it needs to be powered by the board.
- Female USB-A and C ports
- A Bluetooth dongle
- A WiFi dongle
- A Pico Pi for the front controller ports
- Soldering iron and wire
Readying the Super Gameboy.
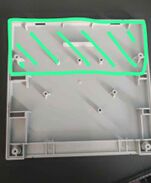
Open up the Super Gameboy and remove everything including the PCB board. Then take the back of the shell and cut some up the support bars to make room for the NFC-reader. Cut everything in the green area.
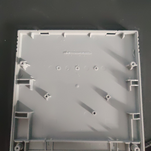
After you're done it should look like this. Make sure they are flat and will not scratch against the back of your NFC reader.
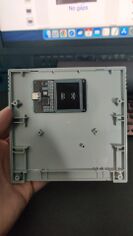
Adhere the NFC reader to the back of the Super Gameboy case as shown. Do notice that the NFC reader should be positioned in a way so that the USB-C cable can still be plugged into it! I made this mistake the first time and placed the NFC reader too flat in the center which caused my USB-C cable not to fit anymore. So play with the cable and the NFC-reader first to get the position just right before applying the double sided tape.
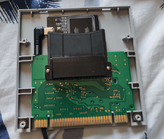
After getting a good position so both of them can fit, adhere the reader to the back. Do keep in mind that just because the NFC-reader is on the shell, it will not 100% mean that it will read the NFC tags in your cartridges because the cartridge slot is still in a fixed position. The only thing you can do to have some wiggle room is apply the tags slightly more to the right in your Gameboy cartridges to make up for that difference (as I did).
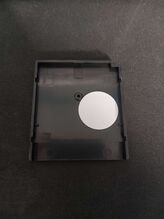
Depending on how you placed the position of your NFC-reader you can/have to play with the position of the NFC tag in your Gameboy cartridges so they align as much as possible. This will give you the highest chance at a successful scan and thus the read of the game (path). So it doesn't matter if the NFC-reader is off-center as long as the NFC tag is in a similar position also.
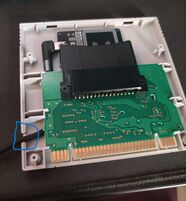
The final step of the Super Gameboy will be to cut a small opening for the USB cable to fit through. I tried it through the button first but that didn't work out very well as the cartridge slot of the Super Nintendo didn't like that. If you cut it at a low position as shown in the picture on the right, this cut will not be visible once the Super Gameboy has been inserted into the case, so I deemed it a necessary evil to do for this project. If you somehow find a better way to route the cable, be my guest.
Written by Phoenix